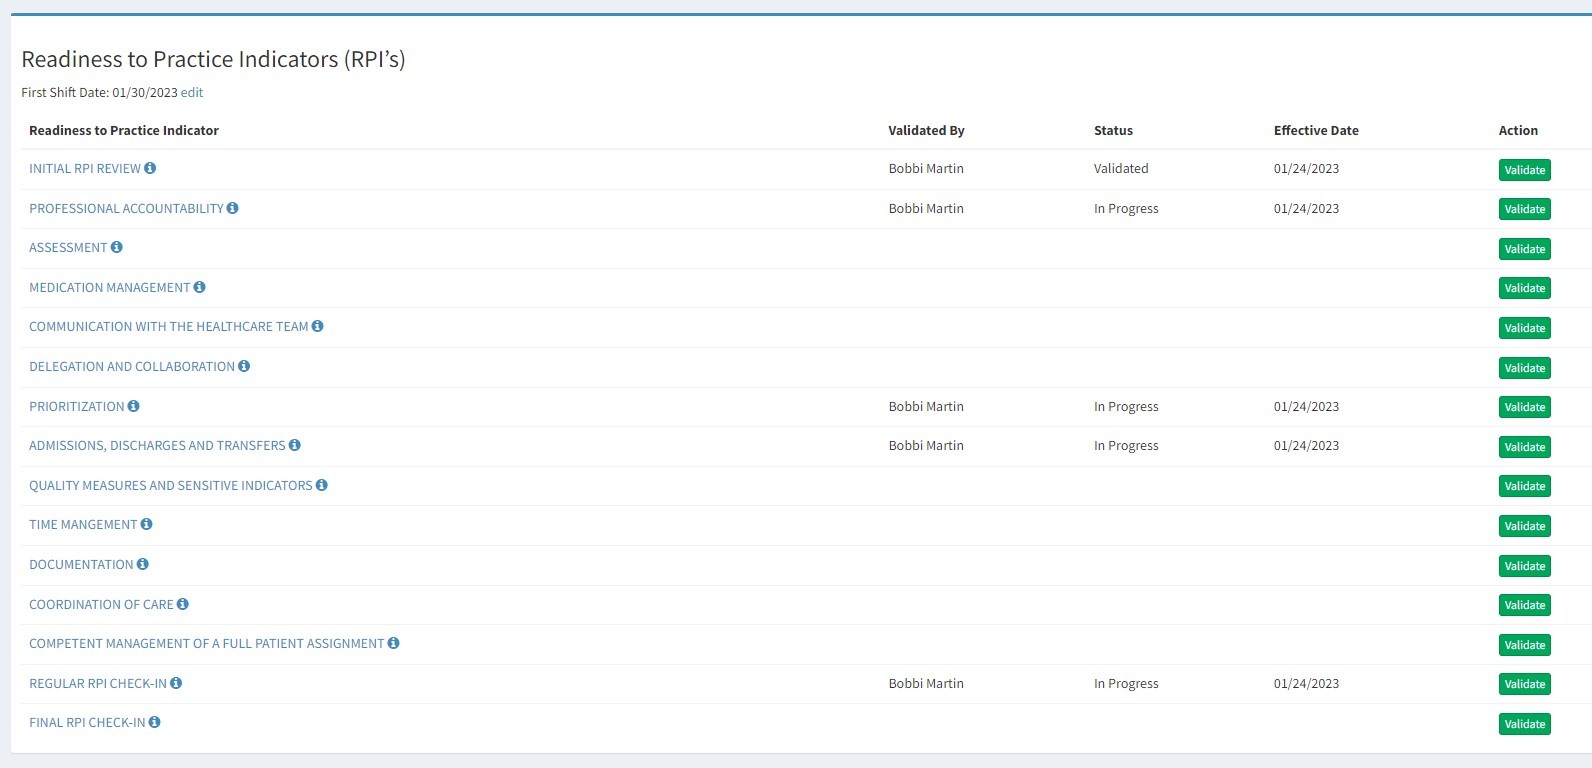
Validate Readiness to Practice Indicators
Understanding the Readiness to Practice Indicators (RPIs) Validation page
TheValidatorcolumn displays the Preceptor or Nurse Leader that last validated the individual RPI. RIPs can be validated by any Preceptor or Nurse Leader that has access to a Preceptee.Statusdisplays the most current status of the RPI.Effective Datedisplays the effective date selected by the person validating.Validatebutton will display for users that have access to validate a RPI.
Historylink will show an audit trail of all validation updates associated with given RPI.
Note: All columns will display the most recent validation update since RPIs can be validated multiple time until the RPIs are marked “Valid”.
Validating an RPI
-
From a user's status page, locate the RPI Validation Status block
-
Select the In Progress link above the progress bar
-
Before you (Preceptor or Nurse Leader) can validate a user, the First Shift Date must be entered. The First Shift Date field will appear at the top of the RPI Validation screen. The First Shift Date can be entered by the Preceptee or any Preceptor/Nurse Leader. This date will mark the date of the first shift for the preceptee. This date will be used to mark the start date for these RPIs.
-
Once the First Shift Date is entered, then you can validate a Preceptee's RPIs.
-
To display an RPI criteria, click on the (i) icon next to each RPI.
-
To validate an RPI, select the Validate button located under the Action column for each RPI. A validation popup will appear.
-
Select the RPI Status to apply to given RPI. (Not Started is list by default. Not Started should only be used for RPIs that are not in progress. In Progress status should be used for RPIs that have been started, but not complete. Validated should be used once a preceptee is 100% validated on a given RPI. Each status will display as a different color on the preceptee's status page to indicate progress)
-
Select the date that the user was effectively validated in given RPI.
-
Upload an optional attachment to the validation if desired.
-
Use the notes section to give additional information on the RPI validation. Notes are optional.
-
When you are ready to save the validation, click the Save button. If you don't click save and leave the screen, the validation will not be saved.
-
RPIs marked as valid cannot be revalidated and the Validate button will disappear. RPIs with the other 3 statuses will be available for validation until the validation status is selected.
-
The history of the validations can be viewed for each RPI by clicking on the History link under the History column. Each time a RPI is validated, regardless of RPI status, the record will appear on the History page.

